Category Uncategorized

Adobe Target QA Methods: Best Practices for Reliable Testing

Adobe Target is an advanced personalisation and testing platform that allows organisations to provide personalised digital experiences using A/B testing, multivariate testing, recommendations, and automatic personalisation. While developing activities is simple, ensuring that the proper audience receives the right content at the right time necessitates meticulous validation. This is where Adobe Target’s Quality Assurance (QA) becomes critical. Without adequate QA, organisations risk launching defective offers, improper targeting, or inconsistent experiences, which can have a detrimental impact on user trust and commercial outcomes.

Adobe Target’s QA capabilities give marketers, analysts, and developers structured ways to preview, test, and troubleshoot activities before they go live. Teams can use specialised QA connections, debugging tools, response tokens, and environmental controls to ensure that activities work as intended across multiple devices and contexts. This process guarantees that personalisations are accurate, reliable, and ready for production, reducing the likelihood of costly errors.

Understanding QA in Adobe Target

In Adobe Target, Quality Assurance (QA) is the process of testing and validating activities such as A/B tests, personalisation campaigns, or experience targeting before they are released to live users. QA ensures that the right content is shown, the correct audience is reached, and experiences work properly across different devices, browsers, and environments.

Conducting Adobe Target QA testing goes beyond checking whether content appears on a page. It verifies that A/B test variations are delivered correctly, personalisation rules are applied as intended, and campaigns remain consistent under different conditions. This helps reduce errors, prevents poor user experiences, and improves engagement with digital activities.

A well-structured Adobe Target QA process builds trust with users, supports higher conversion rates, and ensures reliable campaign performance. By validating activities before launch, marketers can avoid broken layouts and mismatched targeting while delivering smoother personalisation. Proper QA also contributes to stronger SEO performance by keeping site content accurate, user-friendly, and search engine friendly.

We’ve prepared an advanced Pre-Launch QA Checklist to help you meticulously validate your Customer Experience Optimisation experiments for a seamless and error-free launch – Access the full checklist here↗

QA methods in Adobe Target

Adobe Target provides numerous methods for previewing and validating activities prior to release. These QA methods allow teams to test individual experiences, override targeting criteria, and ensure that content is delivered as expected. 

These methods are not exclusive to Adobe Target and can be applied across other testing and personalisation platforms, including VWO, Optimizely, and similar tools.

 Types of QA methods:

  1. Previewing Experiences Using Adobe Target Activity QA
  2. QA using Audiences (By sending Query string parameters using URL)
  3. QA using Audiences (By sending Mbox parameters)
  4. Validating Experiences using cookie-based conditions
  5. By setting specific test parameters using HTTP header value
  6. Testing Geo-Targeted Experiences in Adobe Target

1. Previewing Experiences Using Adobe Target Activity QA 

When an activity is created in Adobe Target, specific QA URLs can be produced. These links enable testers to preview a specific experience within an activity without having to meet the audience constraints. Activity QA URLs are especially valuable for sharing with stakeholders because they ensure that the desired experience will be displayed regardless of targeting. 

Pro: With this method, the testing can be done safely without pushing the activity live.

Con: The Url might break/expire after activity changes

Steps to follow:
  • In Adobe Target, open your activity and copy the QA/Preview URL for each experience

  • Open the link in a fresh or Incognito browser window

  • Verify that the correct experience is displayed on the page

  • Inspect the Network tab in browser DevTools to check the request and response details, confirming the correct activity ID and experience are delivered

  • Inspect response headers and payload to ensure the correct offer is applied on the page

  • Clear cookies and repeat the process for each QA/Preview URL to ensure all experiences are validated.


For more details on Adobe Target Activity QA, please refer to the official documentation link: Activity QA↗

2. QA Using Audiences (By Sending Query String Parameters Using URL)

Adobe Target allows you to append query string parameters to a URL to simulate various user contexts and experiences. These parameters are an effective tool for QA since they allow testers to change how content is delivered without affecting the underlying page or experience. This method is perfect for evaluating personalised experiences and ensuring that targeting guidelines are followed as intended. 

Pro: Provides a flexible way to preview experiences and confirm targeting logic without modifying the underlying page.

Con: In this method, the activity must be published live in order to perform the test.

Steps to follow:
  • Create a custom Query String Parameter (QSP) audience in Adobe Target using site pages, select current page, choose query, set condition to contains, and enter the value ( in this case for example: test=activity1)

  • Assign this audience to your Target activity

  • Open the page URL without any query string parameter and confirm the default experience shows

  • Add the query string parameter (e.g., ?test=activity1) to the URL and open in an Incognito or private browser window

  • Check that the targeted activity or variation is displayed

  • Remove the query string parameter from the URL and confirm that the default experience shows again

Setup Audience with Query string parameter

Standard content displayed

Personalised Experience delivered using Query string parameter

3. QA Using Audiences (By Sending Mbox Parameters)

Real-time personalisation of content is possible via Mbox parameters, which are dynamic variables sent from a website to Adobe Target. To ensure that each audience receives the appropriate material, testers might change these characteristics during quality assurance (QA), such as user type, account status, or basket value. These settings can be changed dynamically with browser tools or extensions, or they can be modified in the site’s code. Verifying these guarantees that real-time data-driven personalisation logic operates as intended.

Pro: Allows testers to validate real-time, data-driven personalisation by simulating variables such as user type, account status, or basket value.

Con: Relies on technical dependencies — someone must trigger and update the correct mbox parameters

Steps to follow:
  • Create an audience in Adobe Target with a custom rule (example: All mboxes parameter test1 equals abc)

  • Create an activity in Adobe Target and map it to this audience

  • Open the site in an incognito or private browser window

  • In console, fire a Target call with the mbox parameter (example: test1=abc) using the below code (make necessary changes depending on the mbox parameters passed while creating audience)

  • Check in developer tools and navigate to Network tab that the delivery request includes the parameter (example: “test1”: “abc”)

  • Verify the correct Target experience loads on the page

Audience setup

Activity setup

📄
adobe.target.getOffer({
    mbox: "YOUR_MBOX_NAME",
    params: {
        PARAMETER_NAME: "PARAMETER_VALUE",
        AT_PROPERTY_NAME: "AT_PROPERTY_VALUE"
    },
    success: function(offer) {
        adobe.target.applyOffer({
            mbox: "YOUR_MBOX_NAME",
            offer: offer
        });
    },
    error: function(status, error) {
        console.log('Error', status, error);
    }
});

Check Delivery call Payload

4. Validating Experiences Using Cookie-Based Conditions

Adobe Target use cookies to recognise users and allocate them to particular experiences according to their test allocation or previous behaviour. During quality assurance, cookies can be changed or placed in the browser to force participation in a specific experience or to mimic various visitor profiles. Testing behavior-based targeting tactics or verifying return visitor experiences are two applications where this is particularly helpful. It is possible to manually modify cookie values as needed by using browser developer tools or extensions.

Pro: Enables testers to simulate different visitor profiles, force participation in specific experiences, and validate behaviour-based or return visitor targeting.

Con: Manual cookie changes can be error-prone, and prior cookie assignments may interfere with test results if not cleared correctly.

Steps to follow:
  • Create an audience using the condition (e.g., Visitor profile ‘cookie’ contains COOKIE VALUE)

  • Create an activity in Adobe Target and map it to the audience

  • Open the site in an incognito or private browser window

  • Set the cookie in the console (example: document.cookie = "test1=exp1; path=/";)

  • Open Developer Tools, go to the Application tab, and confirm that the cookie (example: test1=exp1) is present

  • Pass the cookie value through mbox as a profile attribute value for cookie-based user identification

  • Verify that the correct Target experience loads on the page

  • Clear or change the cookie value and reload to confirm that the activity no longer qualifies or switches

Audience setup

Activity setup

Open the website, add the cookie in the console, and verify it under the Application tab

🌐
// Store cookie value in a variable
var activitycookie = document.cookie
    .split('; ')
    .filter((val) => val.startsWith('COOKIE_NAME'))[0]
    .split('=')[1]
    .split('%7C')[0];

// Pass the cookie value as a profile attribute through mbox
adobe.target.getOffer({
    mbox: "MBOX_NAME",
    params: {
        PARAMETER_NAME: "PARAMETER_VALUE",
        AT_PROPERTY_NAME: "AT_PROPERTY_VALUE",
        "profile.cookie": activitycookie
    },
    success: function(offer) {
        adobe.target.applyOffer({
            mbox: "MBOX_NAME",
            offer: offer
        });
    },
    error: function(status, error) {
        console.log('Error', status, error);
    }
});

Check delivery call Payload

5. By Setting Specific Test Parameters Using HTTP Header Value

This method involves sending specific parameters in the HTTP request to test or trigger particular activities in Adobe Target. By passing these parameters, testers can simulate scenarios such as personalised experiences or targeted content without altering the website code or configuration. Example: Tools like ModHeader, a browser extension, allow testers to modify HTTP headers and cookies dynamically. 

For reference, the ModHeader browser extension can be found here: ModHeader↗

Request headers are pieces of information sent by the browser to the server each time a page loads or an API call is made. Adobe Target reads these headers to determine how to deliver personalised content based on factors like device type, browser, language, and location. During QA, manipulating these headers can help simulate different user conditions and verify that targeting logic works as expected.

Pro: Allows testers to simulate a wide range of user conditions—such as device type, browser, language, or location—without changing the website code, making it easier to validate personalised experiences and targeting rules.

Con: Relies on technical manipulation of headers, which can be complex and may not fully replicate real-world behaviour if other factors (like cookies or server-side logic) are also involved.

Steps to follow:
  • Install ModHeader extension from Chrome/Edge web store to enable header manipulation for testing

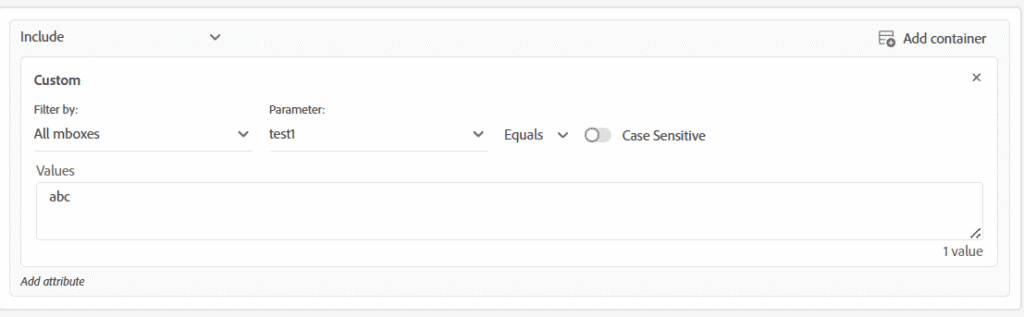
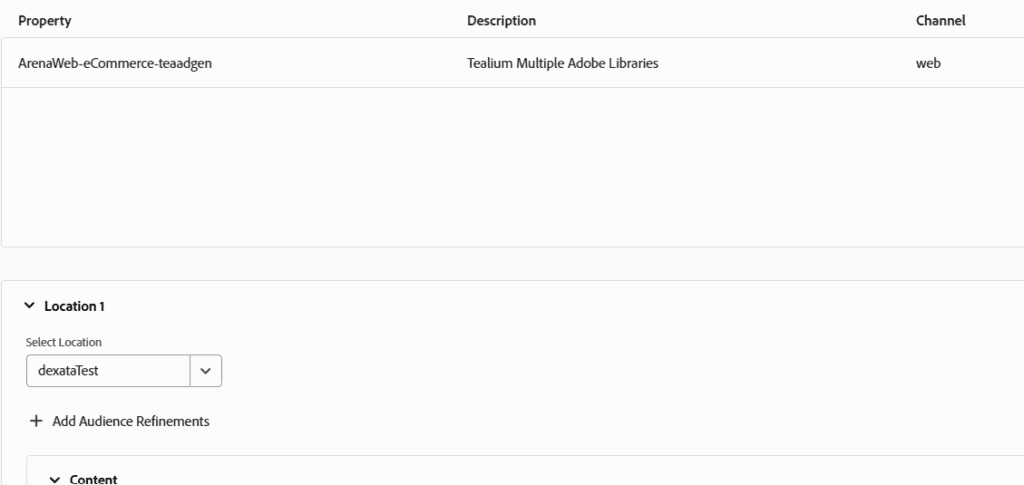
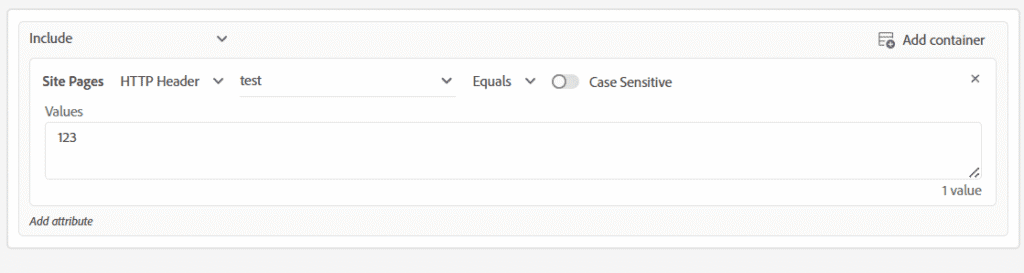
  • Create a custom header parameter with the required name and value defined for the Adobe Target activity audience

  • Open the target website in the browser where the activity needs to be validated

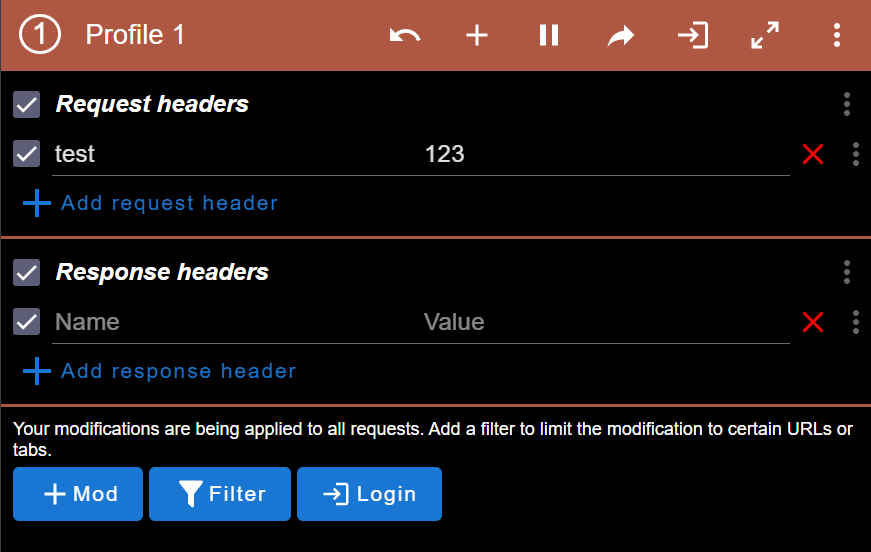
  • Click on the ModHeader extension icon to open the configuration panel

  • Add a new request header in ModHeader, entering the exact header name and value captured from the activity setup

  • Refresh the website page to allow the new header to be included in the request

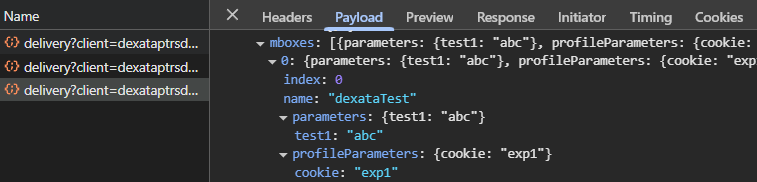
  • Open Developer Tools > Network tab > locate the Adobe Target delivery call and confirm that the custom header parameter is visible under the Headers section

  • Validate on the page that the correct Target experience or variation (e.g., content change, offer, or layout) is delivered as expected

  • After testing, disable or remove the ModHeader profile to prevent it from interfering with normal browsing or future QA

Custom Header value set using ModHeader extension

Check Header value in delivery call

Audience setup using HTTP header

6. Testing Geo-Targeted Experiences in Adobe Target

Adobe Target enables the delivery of customised experiences based on a visitor’s geographical location, such as country, region, or city. Geo-targeting allows marketers to display location-specific content, offers, and messages that enhance relevance and engagement.

During QA, it is important to validate that users from different regions receive the correct localised experiences. Testers can achieve this by simulating various user conditions, reviewing location parameters passed in Target calls, and confirming that the expected activities and experiences are triggered for each region.

One such method is to use the X-Forwarded-For header extension to emulate different geographic IP addresses during testing. This approach helps verify that geo-targeted experiences are correctly delivered without requiring a physical presence in that location. You can find browser extensions for Chrome or Firefox that make it easy to apply this header to your page requests.

For reference, the extension can be found here: X-Forwarded-For extension ↗

Steps to follow:
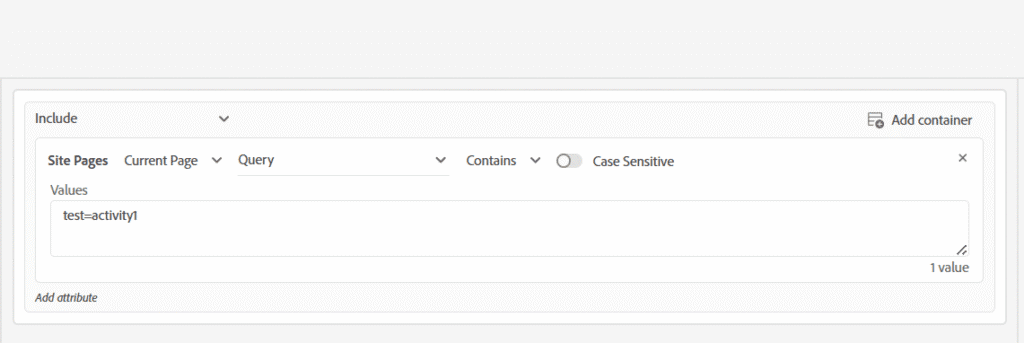
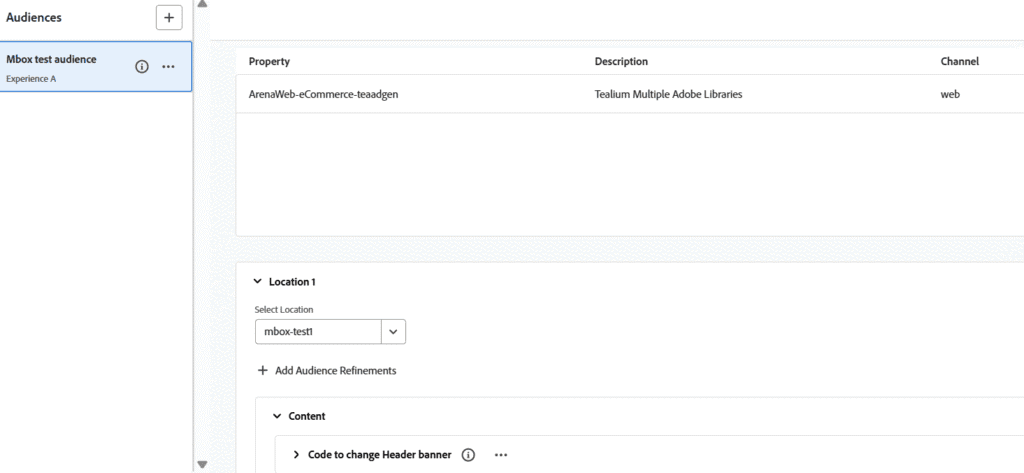
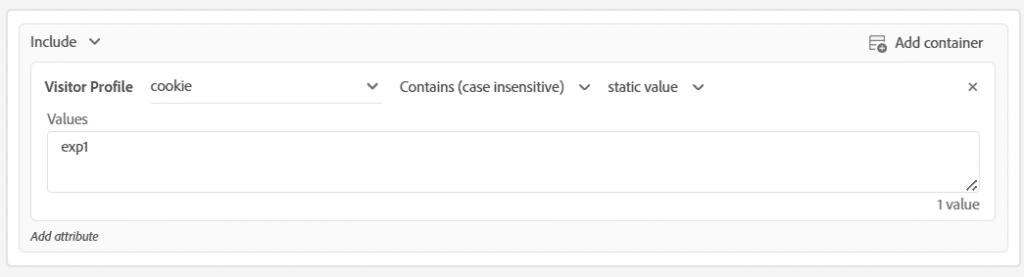
  • Create an audience in Adobe Target with a condition based on geo location (for example, Country/City/State equals NAME).

  • Map the audience to your Target activity.

  • Open the site in an Incognito window or a new browser session to start with a clean state.

  • Obtain the IP address corresponding to the location for which you have set up the audience and wish to validate the experience.

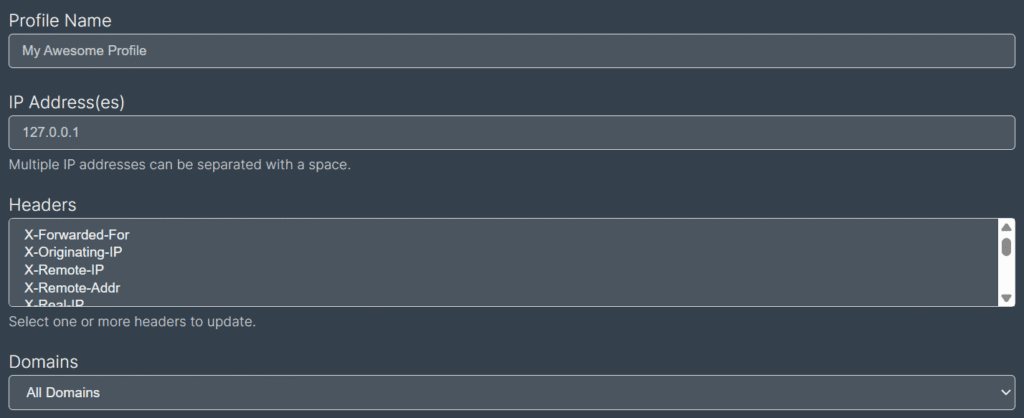
  • Open the X-Forwarded-For header extension and create a new profile by adding the profile name, IP address for the target location, and the domain of the website you want to test. Save the profile once completed — you can create multiple profiles for different regions based on your testing requirements.

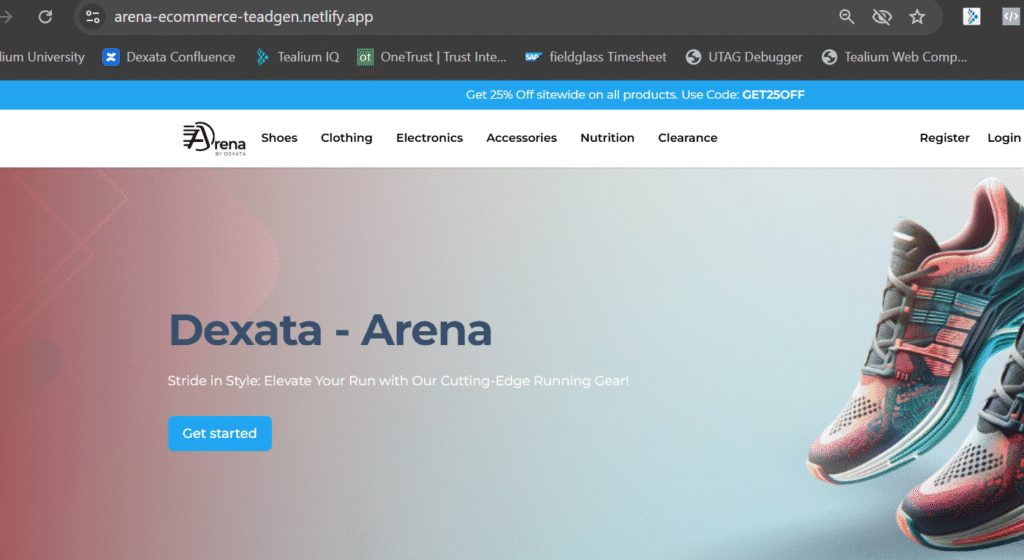
  • Visit your website and reload the page.

  • Verify that the personalised activity is displayed, confirming that the correct Target experience is served for the selected location.

  • Check delivery call, the value of the IP address used in the extension will be present in the request headers.

  • Disable the X-Forwarded-For profile to simulate a visitor who does not meet the audience condition.

  • Reload the page again and confirm that the default experience is displayed.

X-forwarded-for extension

When to Use Different Adobe Target QA Methods:

  • Activity QA: Use when you want to test an experience safely without making the activity live to real users. This method provides a special QA URL that bypasses targeting rules, making it easy to share previews with stakeholders.

  • Query String Parameters: Use when Activity QA URLs are not working or not available. By appending parameters to the URL, you can force a specific experience to load, which is useful for testing targeted variations in a live environment.

  • Other methods: Use when Activity QA URLs and Query String Parameters are not working or suitable. Options like cookie-based, mbox parameters, or ModHeader can help replicate the right conditions and validate the experiences.
  • Geo-targeted: Use when an experience is restricted to specific geographic locations and you want to preview or test it as if you were in that location.

Conclusion:

Implementing comprehensive QA in Adobe Target is vital for ensuring that digital campaigns function exactly as intended and deliver highly relevant experiences to each audience segment. By thoroughly testing targeting logic, personalisation rules, audience segmentation, and content variations across multiple devices and environments, teams can identify and resolve errors before campaigns go live. This meticulous approach not only prevents inconsistencies and technical issues but also enhances user engagement, builds trust, and drives higher conversion rates. In an era where data-driven personalisation defines customer experience, robust QA processes are indispensable for achieving reliable, impactful, and measurable marketing outcomes.

Want to learn more?

Explore Dexata Academy — our free learning platform with practical lessons and real-world use cases. 

About The Authors

Picture of Karan More
Karan More

Karan More is a Digital Analytics Specialist, skilled in managing customer data, tracking user behaviour, and optimising digital interactions. Leveraging technical expertise and data insights, Karan delivers impactful, data-driven business value.

Connect with KARAN
What do you think?

Leave a Reply

Your email address will not be published. Required fields are marked *

[posts_like_dislike id=post_id]

What to read next

Leave a Reply

Your email address will not be published. Required fields are marked *

top
Adobe

Adobe Analytics
Adobe Target
Adobe Audience Manager
Adobe Experience Manager
Adobe Campaign Manager
Adobe Real-Time CDP

Google

Google Analytics (GA4)
Google Analytics (360)
Google Optimize
Google Tag Manager

Tealium

Tealium AudienceStream CDP
Tealium EventStream
Tealium IQ

Segment
Quantum Metric
MoEngage
CleverTap
MixPanel
OneTrust
Playrcart
VWO
Optimizely